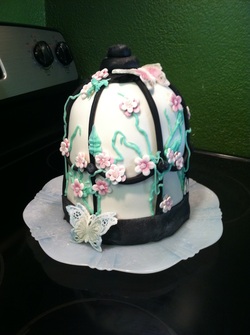
Today we will discuss how to finish off your birdcage cake. Don't despair if fondant is a little intimidating, it takes practice. However, with this cake you can also cover the main body in buttercream and use fondant for the accents.
Make sure that your work surface is generously coated with powdered sugar or cornstarch. You can also use two pieces of parchment paper. Start by placing your room-temperature fondant in the center of your workspace. Flatten it with your palm as much as you can without tearing it. Then use a large rolling pin to work from the center of your fondant out. You want to make the circle large enough to drape over the cakes. As you drape the fondant, work your way around with your palm, smoothing as you go. This takes practice, but if you get a few mistakes you can always cover it with a flower, leaf or vine later on.
Cut a strip of paper about an inch wide and long enough to fit around the cake at the widest area. Wrap around cake, and cut to fit. Fold your paper strip in half then half again. Open the strip up, wrap around cake and tape the ends. At each fold that you made, make a mark. Move the paper up three inches, tape and mark at each fold again. Remove the paper.
Using a pizza cutter or sharp knife, cut a 1/2 inch wide strip the height of the cake, and one for each place that you made a mark. Using a food-only paint brush, apply a small amount of water or vodka to the white fondant at each area that you marked, vertically. Gently apply the strips from top center of the dome, down to the bottom.
Use your paper strip as a guide, cut a 1 inch wide strip of black fondant long enough to go around the cake at the very base and apply with paint brush and water. (A very small amount of water or vodka goes a long way!) Cut another strip, 1/2 inch wide and long enough to circle the cake and apply this three inches above the first strip.
Using a 4 inch diameter cookie cutter or glass, cut a circle to put on the top of the dome; this will also cover the ends of your vertical strips. You can use a toothpick or fork to make holes in the circle, to add interest. Attach with the water/vodka and brush.
Make "rivets" out of the black fondant; just make small balls then flatten slightly. Attach these wherever the vertical and horizontal strips cross.
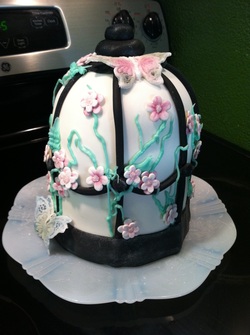
Make a 1 inch ball and flatten slightly. Attach this with a little water or vodka to the very top of the cake dome, centered on the black circle. Repeat this step and make the second ball roughly 1/2 inch and attach to the top of the first ball.
You can brush the black fondant with edible metallic paint in silver to create a more realistic finish. Use a dry paintbrush and dry edible paint or liquid paint.
Mix up some buttercream icing and tint green. Use small pastry bag with #2 tip to make vines around your cake.
Finish up your birdcage by attaching flowers with a dab of buttercream.
Enjoy, and remember! It is a piece of art, meant to be eaten.
Cut a strip of paper about an inch wide and long enough to fit around the cake at the widest area. Wrap around cake, and cut to fit. Fold your paper strip in half then half again. Open the strip up, wrap around cake and tape the ends. At each fold that you made, make a mark. Move the paper up three inches, tape and mark at each fold again. Remove the paper.
Using a pizza cutter or sharp knife, cut a 1/2 inch wide strip the height of the cake, and one for each place that you made a mark. Using a food-only paint brush, apply a small amount of water or vodka to the white fondant at each area that you marked, vertically. Gently apply the strips from top center of the dome, down to the bottom.
Use your paper strip as a guide, cut a 1 inch wide strip of black fondant long enough to go around the cake at the very base and apply with paint brush and water. (A very small amount of water or vodka goes a long way!) Cut another strip, 1/2 inch wide and long enough to circle the cake and apply this three inches above the first strip.
Using a 4 inch diameter cookie cutter or glass, cut a circle to put on the top of the dome; this will also cover the ends of your vertical strips. You can use a toothpick or fork to make holes in the circle, to add interest. Attach with the water/vodka and brush.
Make "rivets" out of the black fondant; just make small balls then flatten slightly. Attach these wherever the vertical and horizontal strips cross.
Make a 1 inch ball and flatten slightly. Attach this with a little water or vodka to the very top of the cake dome, centered on the black circle. Repeat this step and make the second ball roughly 1/2 inch and attach to the top of the first ball.
You can brush the black fondant with edible metallic paint in silver to create a more realistic finish. Use a dry paintbrush and dry edible paint or liquid paint.
Mix up some buttercream icing and tint green. Use small pastry bag with #2 tip to make vines around your cake.
Finish up your birdcage by attaching flowers with a dab of buttercream.
Enjoy, and remember! It is a piece of art, meant to be eaten.
 RSS Feed